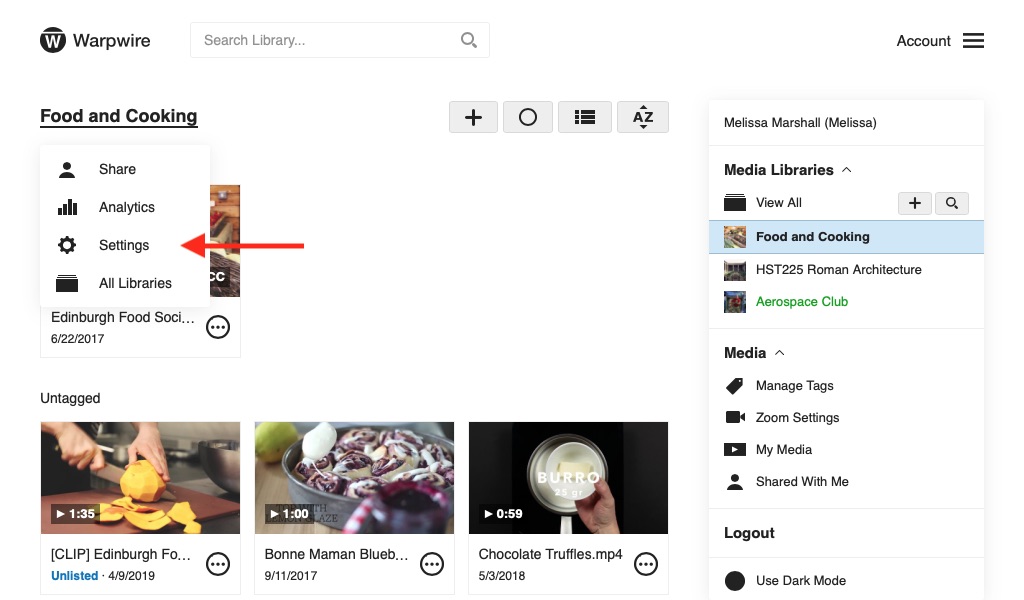
To access Media Library Settings, just click the Media options icon  to the right of any Media Library title, then click "Settings."

Or, if you're already within a Media Library, click the Media Library title on the top of the screen, and select "Settings" from the menu.

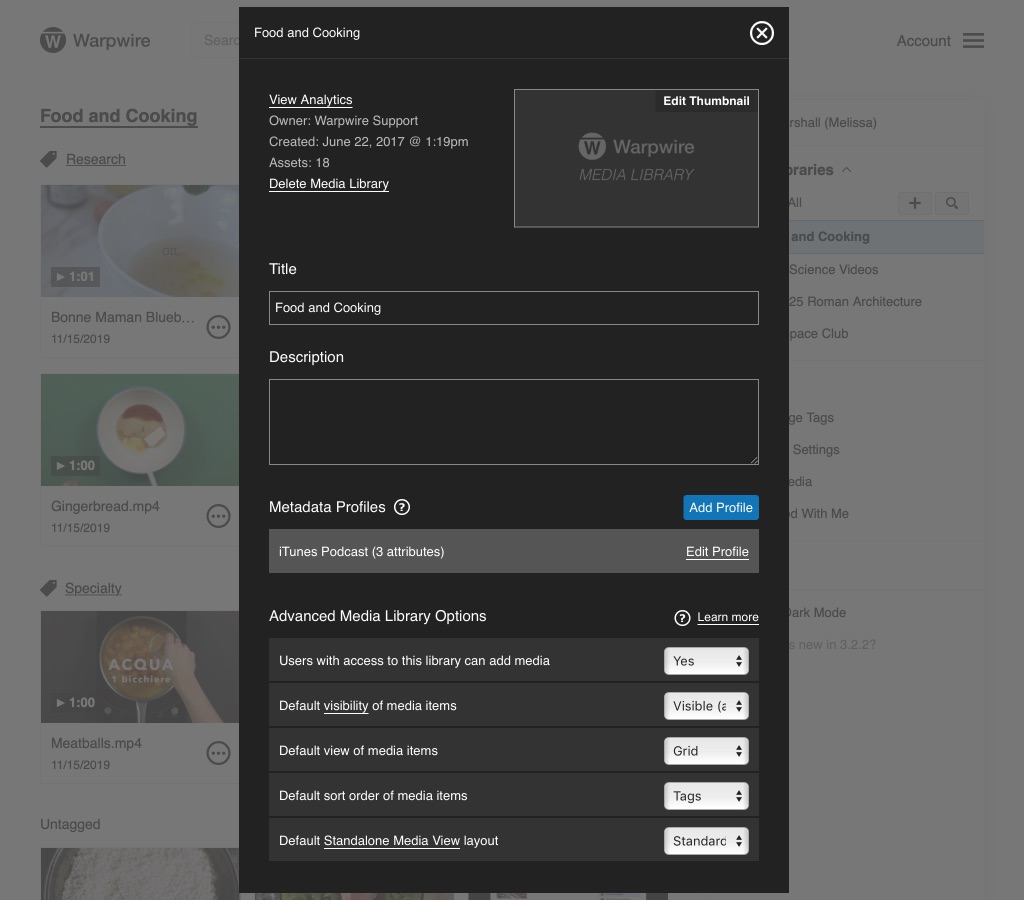
From the Media Library Settings window, you'll be able to edit the Media Library's title and description, edit contributor permission (allowing or disallowing users to upload content to the Media Library), change default visibility, select your preferred sort order for the library, delete the Media Library, and update default layout of media shared via links. Please note that these options change based on the user's Warpwire Permission to the Media Library. (Fig. 1)

Fig. 1 - Warpwire Media Library options pane
Add Custom Thumbnail
You can upload a custom thumbnail to represent your Media Library. If publishing your Media Library as a podcast, the library of content will show this thumbnail.
Edit Title and Description
Just type in the Title and/or Description text boxes to edit them. Click "Save Changes" when you're finished.
Add Metadata Profile
You can add Metadata Profiles to your Media Library.
Toggle Media Contribution
Select "Yes" or "No" from the "Users with access to this library can Add Media" drop-down menu. Select "Yes" if you'd like any user with access to this Media Library to upload or capture media (Sharing Permissions). By default, only the Media Library admins can upload or capture content.
This can be quite useful for distance education, or for classes with a public speaking or language component. It's convenient to have students record themselves so that the instructor and their classmates can give them feedback.
Toggle Visibility
The next drop-down menu allows you to turn default visibility "Visible (all Users)" or "Unlisted (only Admins)". Set to "Unlisted (only Admins)", those with non-admin access to the Media Library will only be able to see assets they've uploaded themselves by default. Any other videos, you'll be able to make "Visible" or "Unlisted" to control if non-admins can see them. As an admin, you'll still be able to see all assets in the Media Library, regardless of who uploaded them. This feature is a good way to share content one-on-one — foreign language students uploading graded video responses, for example.
Set Default View
The next drop-down menu allows you to define the default view for the assets in your Media Library. You can select "Grid" or "List." Grid view has larger thumbnails and a visual focus. List view is more compact and makes it easy to browse asset titles, with smaller thumbnails to the left. (Fig. 2)

Fig. 2 - Side by side comparison of grid and list views within the Warpwire media platform
Set Default Order
Finally, the "Default sort order of media items" drop-down allows you to select a default sort order for anyone viewing your Media Library. If you've taken the time to Tag your content, you can sort by Tag. If you prefer reverse chronological, you can sort by Date. What you select in this drop-down will hold true for other users who view your Media Library by default.
From the Media Library Settings window you can also: Delete Media Libraries.
Standalone Media View Layout
Media Library Admins can edit the Standalone Media View Layout if they want to hide metadata when an asset or library is shared.
See also: Remove assets from Media Libraries, Delete assets from My Media and Custom Media Library Thumbnail.
Was this article helpful?
That’s Great!
Thank you for your feedback
Sorry! We couldn't be helpful
Thank you for your feedback
Feedback sent
We appreciate your effort and will try to fix the article