Add Warpwire LTI Tool to Blackboard
In order to make best use of Warpwire within your Blackboard instance, you'll need to add the Warpwire LTI tool to Blackboard. Follow the following instructions to get the plugin installed.
- Navigate to "System Admin" (Fig. 1)
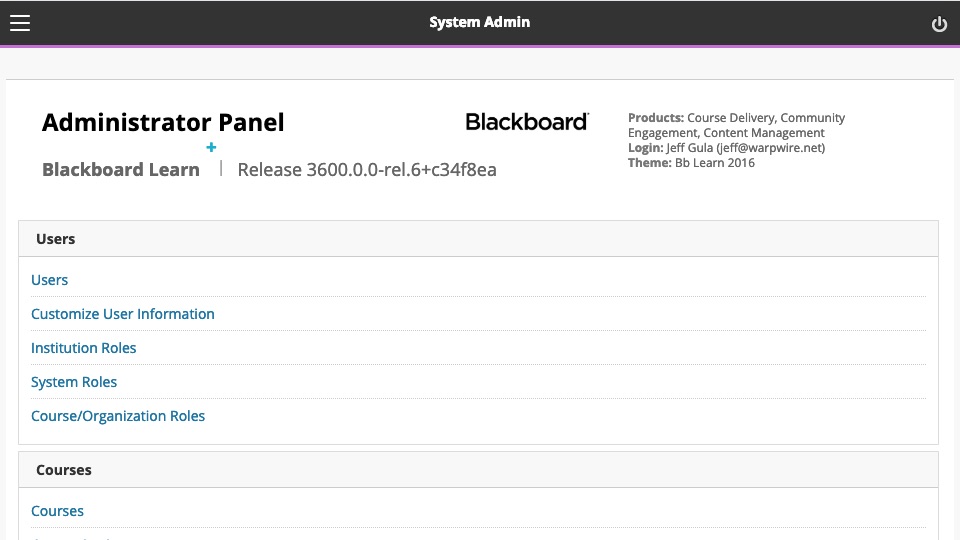
Fig. 1 - System Admin
- Click "LTI Tool Providers" under the 'Integrations' heading (Fig. 2)

Fig. 2 - LTI tool providers
- Click the "Register Provider Domain" button (Fig. 3)

Fig. 3 - Caption can go here
- Set the Provider Domain to: [YOUR URL].warpwire.com
- Provider Domain Status should be set to "Approved"
- Default Configuration should be set to "Set Globally"
- The Tool Provider Key and Secret will be provided by Warpwire (Fig. 4)
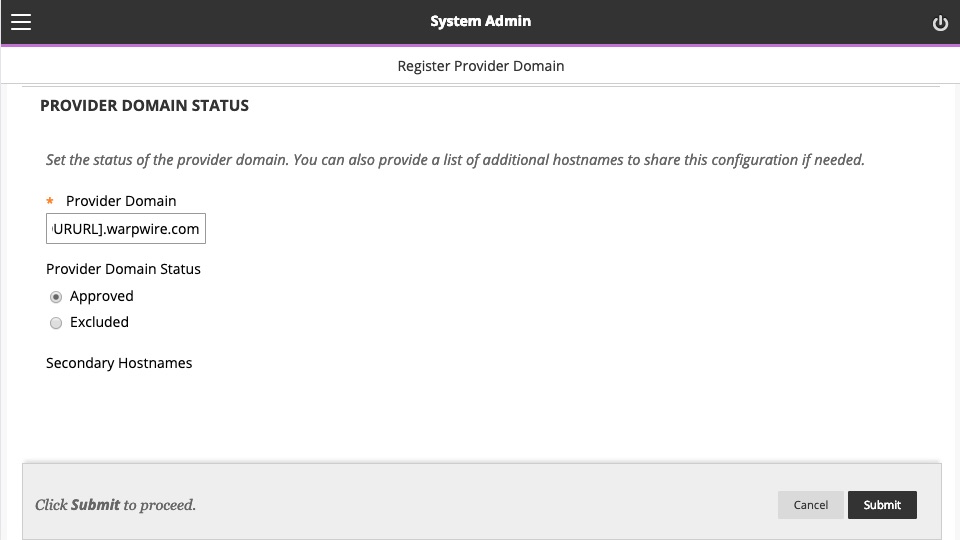
Fig. 4 - Provider domain status
- Send User Data should be set to "Send user data only over SSL"
- Check all three boxes for User Fields to Send (Role in Course, Name, and Email Address)
- Allow Membership Service Access should be set to "Yes"

Fig. 5 - Caption can go here
- Click Submit
Manage Placements
- Back on the LTI Tool Providers page, scroll down to [YOUR URL].warpwire.com
- Hover over the small arrow to the right and select "Manage Placements" (Fig. 6)

Fig. 6 - Manage Placements
- Click "Create Placement" - You'll be making two placements: one for the course tool and one for the deep linking plugin (Fig. 7)
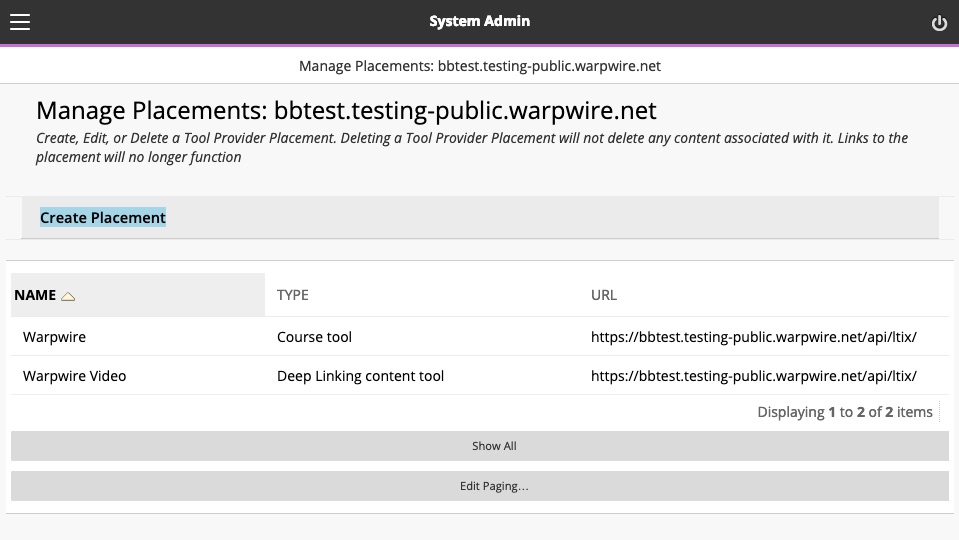
Fig. 7 - Create Placement
- Label the first placement Warpwire and fill out as follows:
- Handle: wwtool
- Type: Course Tool, then select "Student"
- Tool Provider URL: https://[YOUR URL].warpwire.com/api/ltix/ (Fig. 8) (Fig. 9)

Fig. 8 - Placement label

Fig. 9 - Tool provider information
- Label the second placement Warpwire Media and fill out as follows:
- Handle: wwmedia
- Type: Course Content Tool, then select "Supports Deep Linking"
- Tool Provider URL: https://[YOUR URL].warpwire.com/api/ltix/ (Fig. 10) (Fig. 11)

Fig. 10 - Second Placement

Fig. 11 - Tool provider information
- When you're finished, the manage placements page should look like the screenshot below (Fig. 12):

Fig. 12 - Manage placements page
Last modified May 31, 2024
Was this article helpful?
That’s Great!
Thank you for your feedback
Sorry! We couldn't be helpful
Thank you for your feedback
Feedback sent
We appreciate your effort and will try to fix the article